
Update on Slash… Nitro, not the Guitarist… although I hope he is well
Phew! It’s alive! IT’S ALIVE! At least, it should be alive with the new TRX 3.3 Nitro Traxxas motor! We got the engine installed and the car is ready for break-in. Let me first note that I got scammed. “Hi, my name is Paul and I no longer cruise eBay at night looking for good deals. I am a victim of my greed!” Okay, that is out of the way. What education have I gleaned after paying my tuition to the school of hard knocks? (Man I wish I could get a tax credit for paying tuition to the school of hard knocks! I would make money from the US of A!). However, Traxxas’ power-up program hit it out of the park. I received this new motor in less than a week! Seriously, less than a week! That is impressive customer service. They really do stand behind their product and it is hardly worth overhauling a motor unless you like rebuilding small motors.
I learned the translation of “I only drove this thing a few times” really means: “Full throttle or bust BABY!” Remember that you can’t assume that every old lady just drove her car to church and the grocery store maybe once or twice a week.
(Best car commercial… hands down. That is just a fact!)
I learned a ton about Nitro. I still think that the Traxxas Slash nitro is a great bang for the buck. I know people will crab that it is only a one-speed transmission, and it doesn’t carry you to the moon. It also does not fuel itself…. blah…. blah…. blah…. When the haters hate just remember that this truck is $350 Brand new and ready to go! I mean seriously READY TO GO! Just add fuel, do 6 tanks for break-in, and let it RrrrrRRRRRrrrrrrrRRRipppppppp! The sound that nitro makes is intoxicating.
Some notes about engine assembly and mounting:
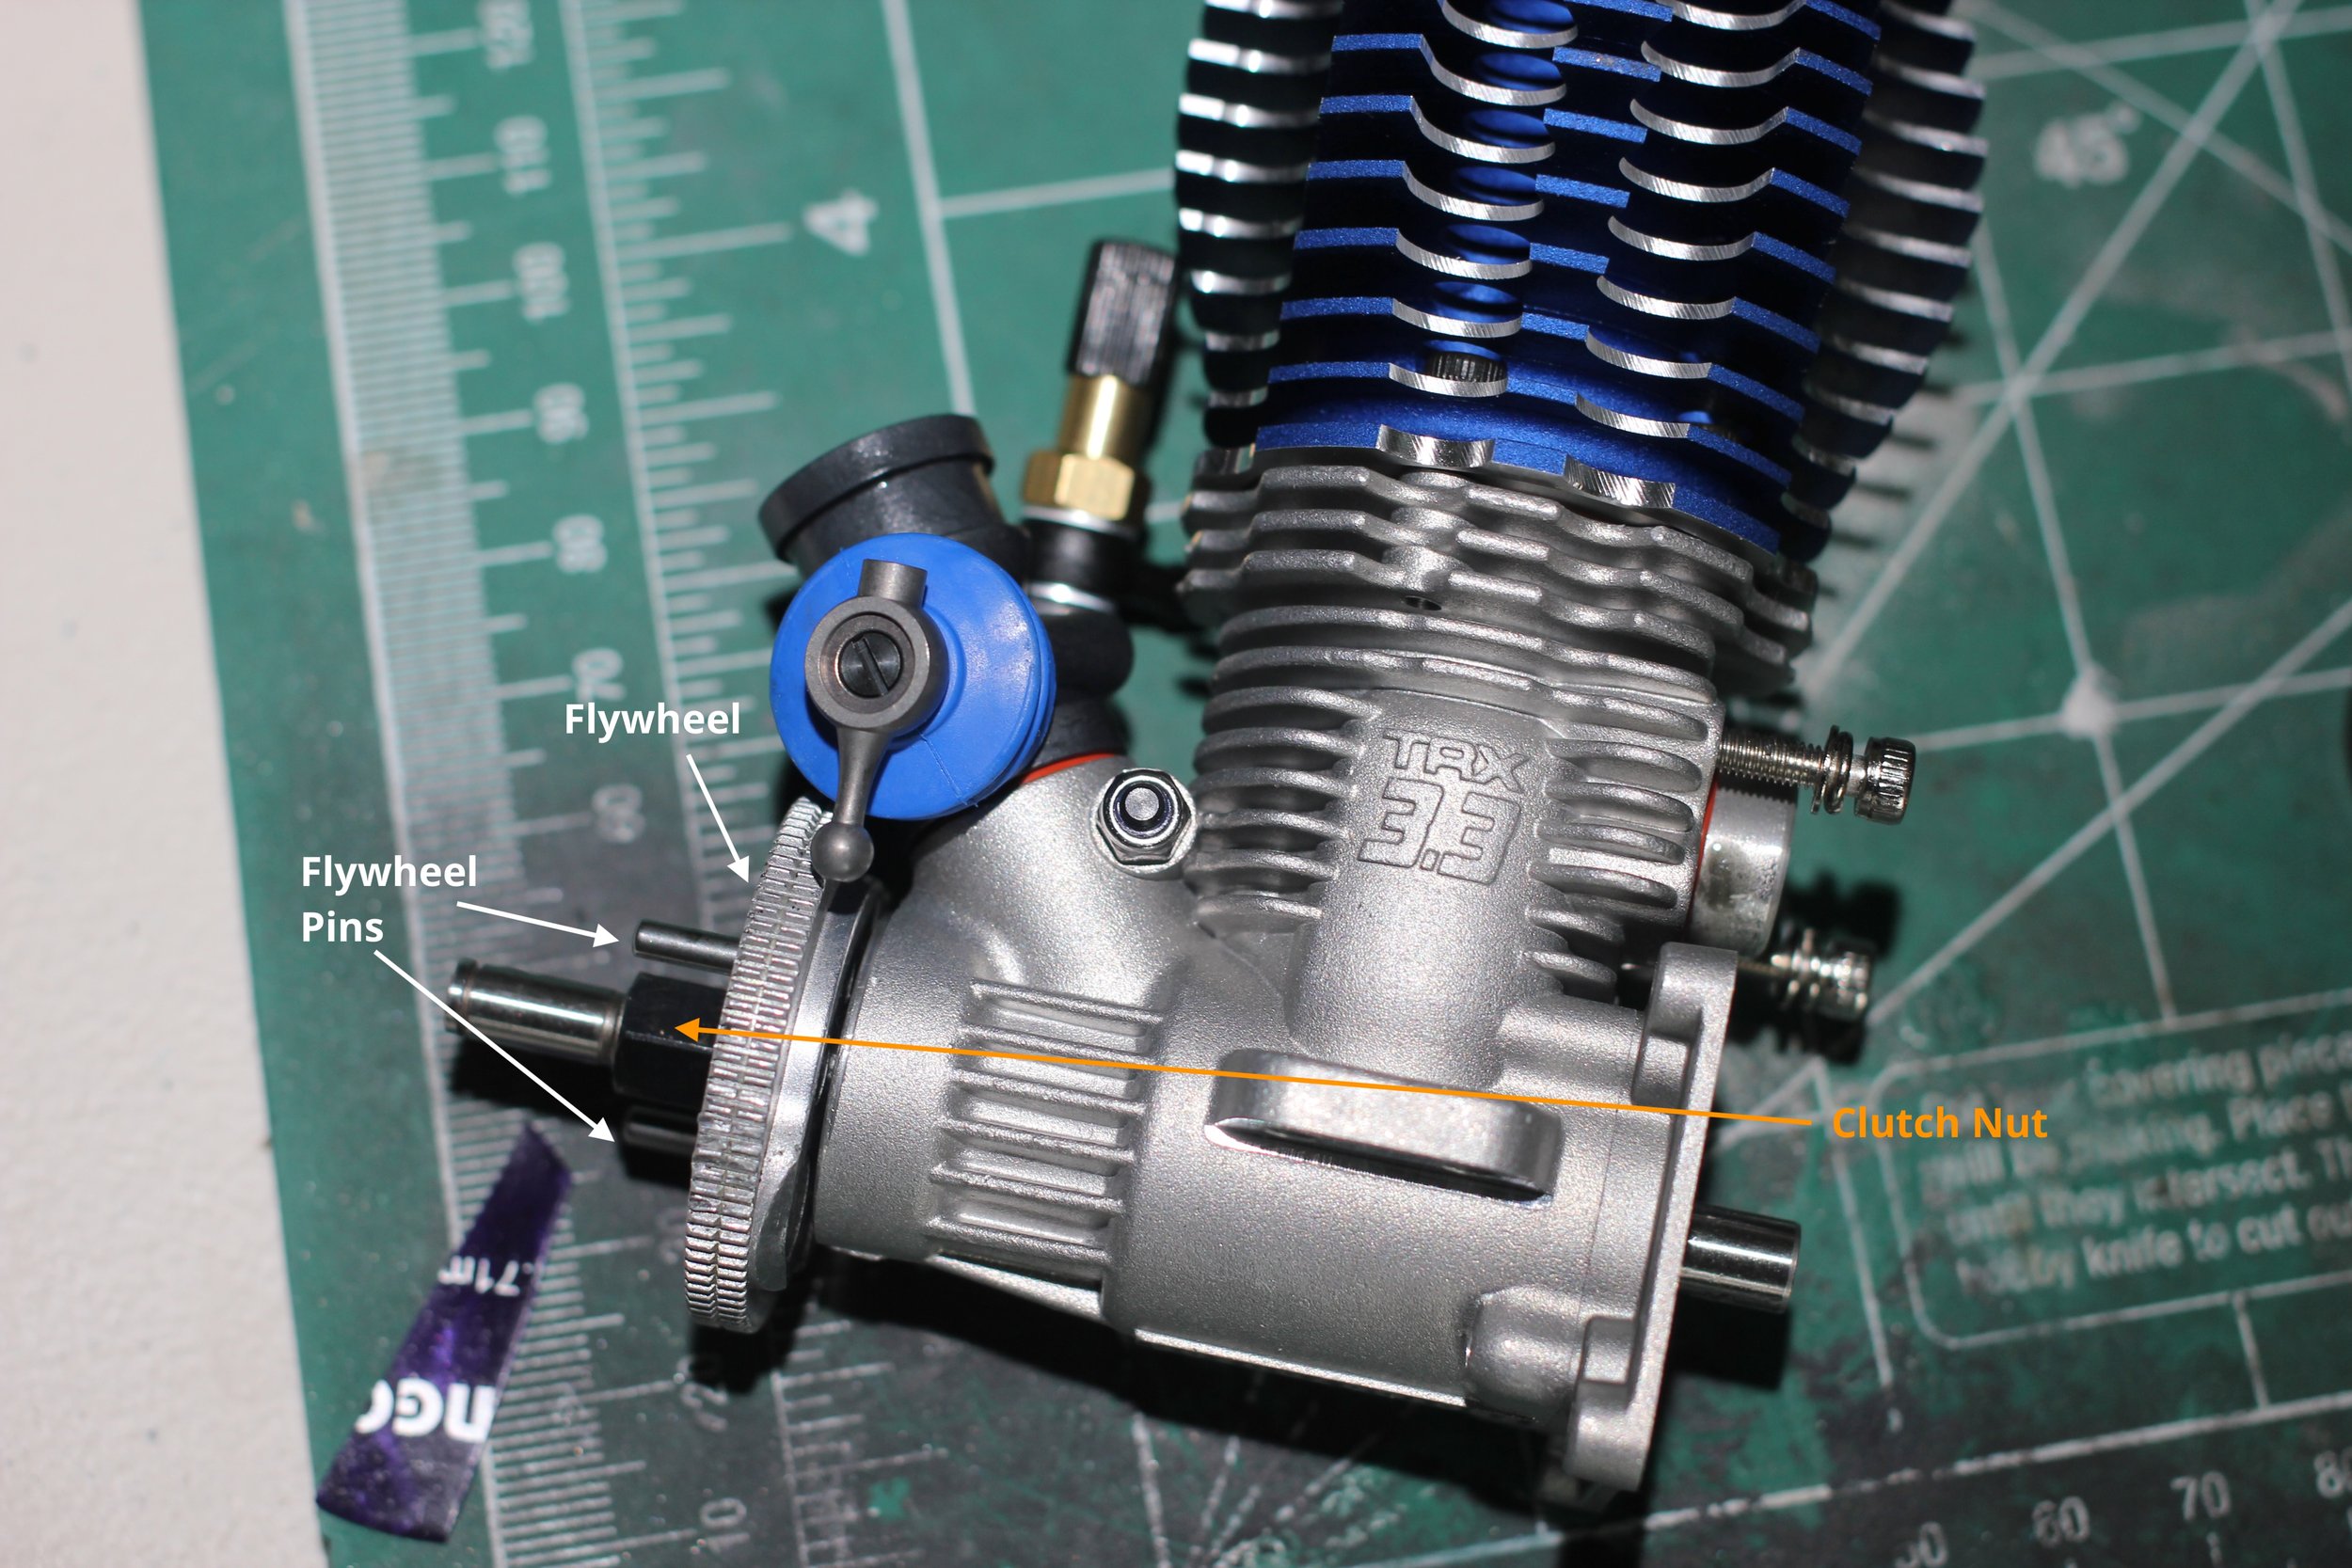
Ideally, you are going to want a flywheel wrench for this part. I know that people have used pliers, but you are taking a chance of running out to the hobby store to buy a new flywheel. Who knows if they even have one in stock?
Attach the flywheel wrench to the flywheel pins, and then turn the clutch nut with the nitro glow plug removal multi-tool or ratchet. It is usually an 8mm or 10mm depending on the engine.
You simply hold one of the pins with the flywheel wrench and then tighten the clutch nut to German spec. You know, ghood N tight. If you don’t feel like you are on the verge of puking you didn’t pronounce the Germon spec correctly. The translation in English is roughly, “Good and Tight.”

The next thing you want to do is check the carb alignment. I may or may have experience with this because I failed to note the problem. Well, I am the “Special” or the “Chosen One” who holds the piece of resistance, and so I did not do this. Or I totally did it and channeled Chris Farley walking into the sliding glass door in Tommy Boy, “Son ofa….”. Getting back on track….
The thing to note before you wiggle the motor into place is to make sure that the throttle arm is in line with the intake for the air filter. You might think, “How the heck do you adjust that thing? This is going to be difficult.” Well, this is why I am here. For a limited time and for only 19.95 I can tell you how to make the adjustment AND you get a free crappy toaster! But wait there’s more…. Or maybe not.

The temptation you might have is to start turning screws to see what will allow the throttle arm to turn. Please don’t do that. You will really hate life when you try to fire up the motor. Well, I guess you won’t hate life, but you will have to turn all the carb screws back to factory settings which is going to delay the fun factor.
All you have to do is take a hex key, I love this set, I was able to find the correct hex, get a really good hold on the set screw, and loosen it. The screw is on German spec remember, “Ghoooot N Tight” so you have to give it a pretty good turn. Once the screw is loose you can turn the throttle arm to align roughly the same angle as the intake.
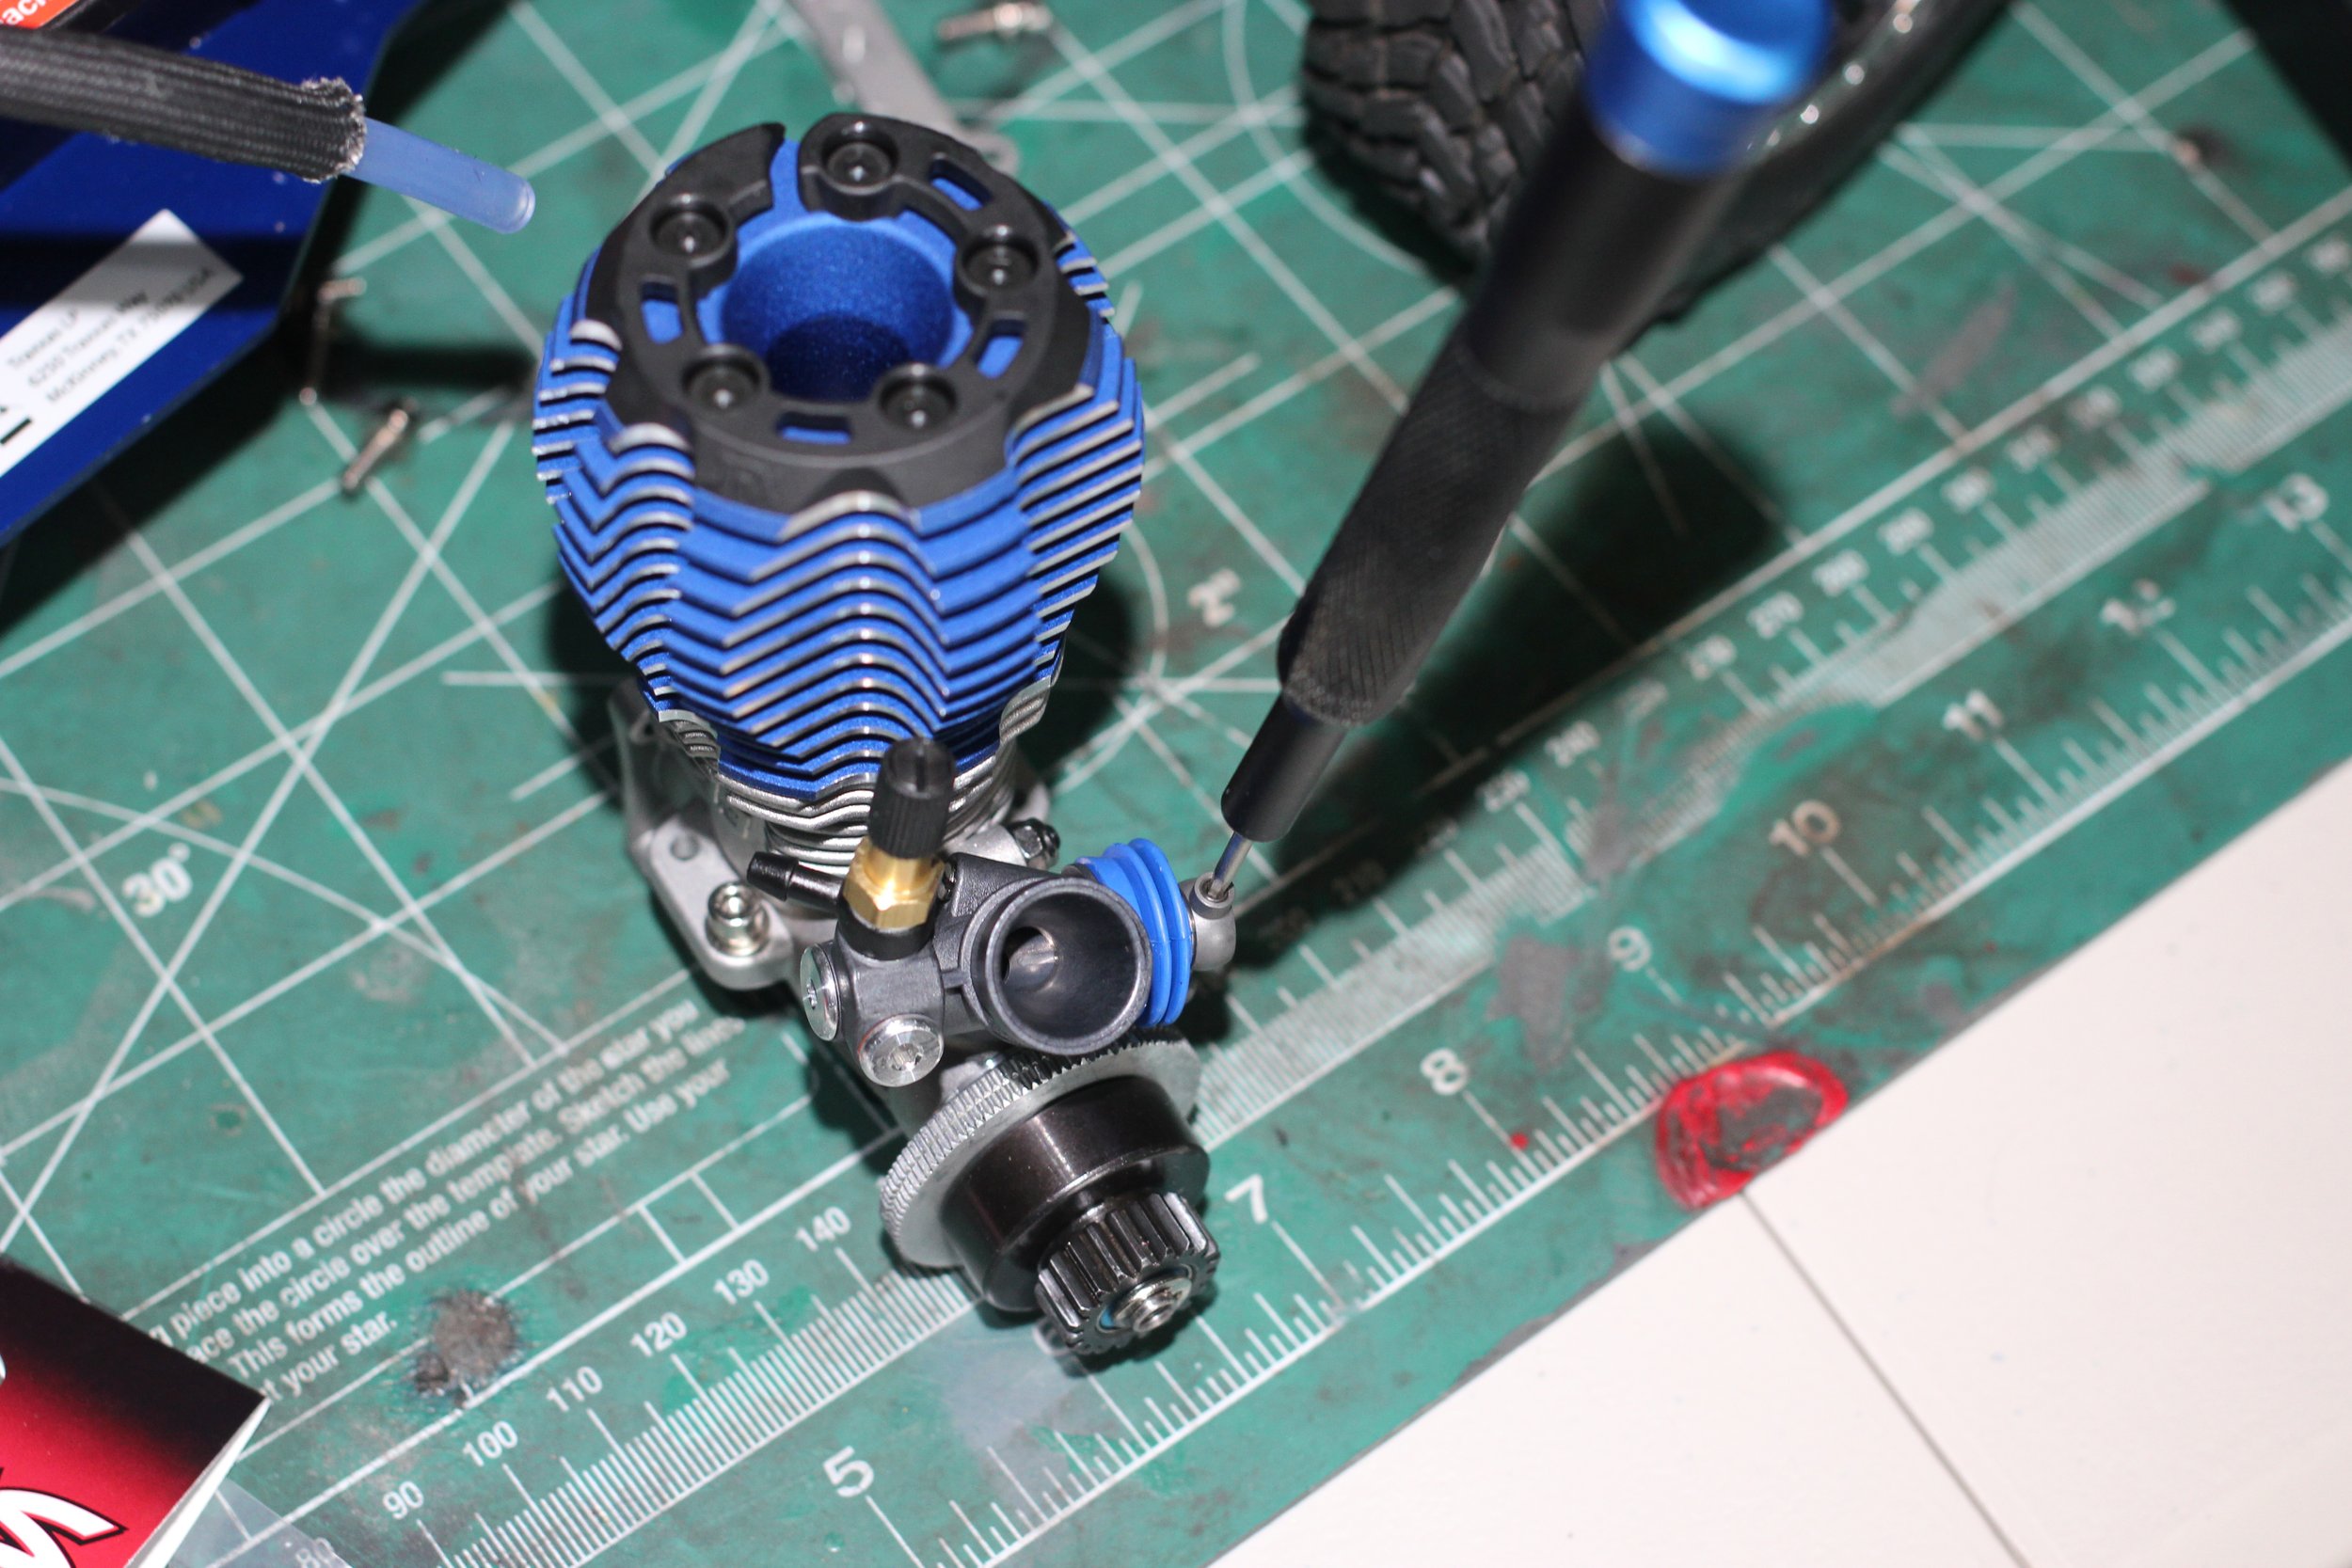
This is me working my magic and getting the throttle arm in line with the intake. Once you get the screw loose you can swing the throttle arm right in line.

You also have to get the clutch plates mounted in the bell housing. I hooked the spring first. I lined up the clutch plates facing each other, and then I rolled the spring over them. If you notice, I laid out the ball bearings and the shims to make sure I didn’t have too much play in the bell housing. I used the Traxxas Teflon washers. You will probably want to pick some up at your hobby store, not to mention the e-clips or circlips. Traxxas has a pretty handy variety pack. I am pretty sure that it is 5mm e-clip and it is nice to have an e-clip tool. However, you can use pliers if you are careful. It is not going to burn the house down or anything, but it is frustrating when they fly in the air, and then you have to look for it. Remember that Tommy Boy crashing into the sliding door? Yeah, you might have a few of those moments. Hopefully, you don’t shoot your eye out in the process. Oh, different movie… my bad.
The video below is a pretty good explanation of the clutch setup. I did not make the video or produce the video. I only linked the video so please don’t harm the messenger.

The clutch is sitting on the flywheel all pretty. Supposedly, you can flip the clutch to get a more aggressive takeoff. I have not played with this option, but it might be something to play with in the future.

When you have the motor roughly placed, but before you wiggle it all the way in, make sure that the carb is able to accept the fuel line. It might bump up against the differential case just enough to prevent the fuel line from getting seated on the fuel intake. Yes, I had another Tommy Boy experience. I am getting really good at wiggling the motor into the chassis and out of the chassis by this point. You do the hokey pokey and you wiggle the motor out. That’s what it’s all about…..
This is the tricky part.This is the exhaust side of the motor. I found that pulling out the motor mount behind the gas tank was the easiest way to move the motor into place. You will have to jiggle it to get it to move. The other thing to note is if the flywheel is on a car stand the motor will not drop into place. The flywheel sticks through the bottom of the chassis in the cutout. (Ignore the black wire. I cut the zip ties and moved the wire with the other wires to clean up the chassis.)
So, I slide the motor into place. I pulled the motor toward the back of the chassis a little bit. I slid the motor mount into place, lined up the screws, and tightened it all down. The oval hole is where you put the screw, and the hole is machined that way so you can move the motor to set the gear mesh on the other side.

If the carb is just too tight against the differential you just need to slide the motor out, turn the nut maybe a quarter turn to loosen it, and you can adjust the carb so the intake will take the fuel line.
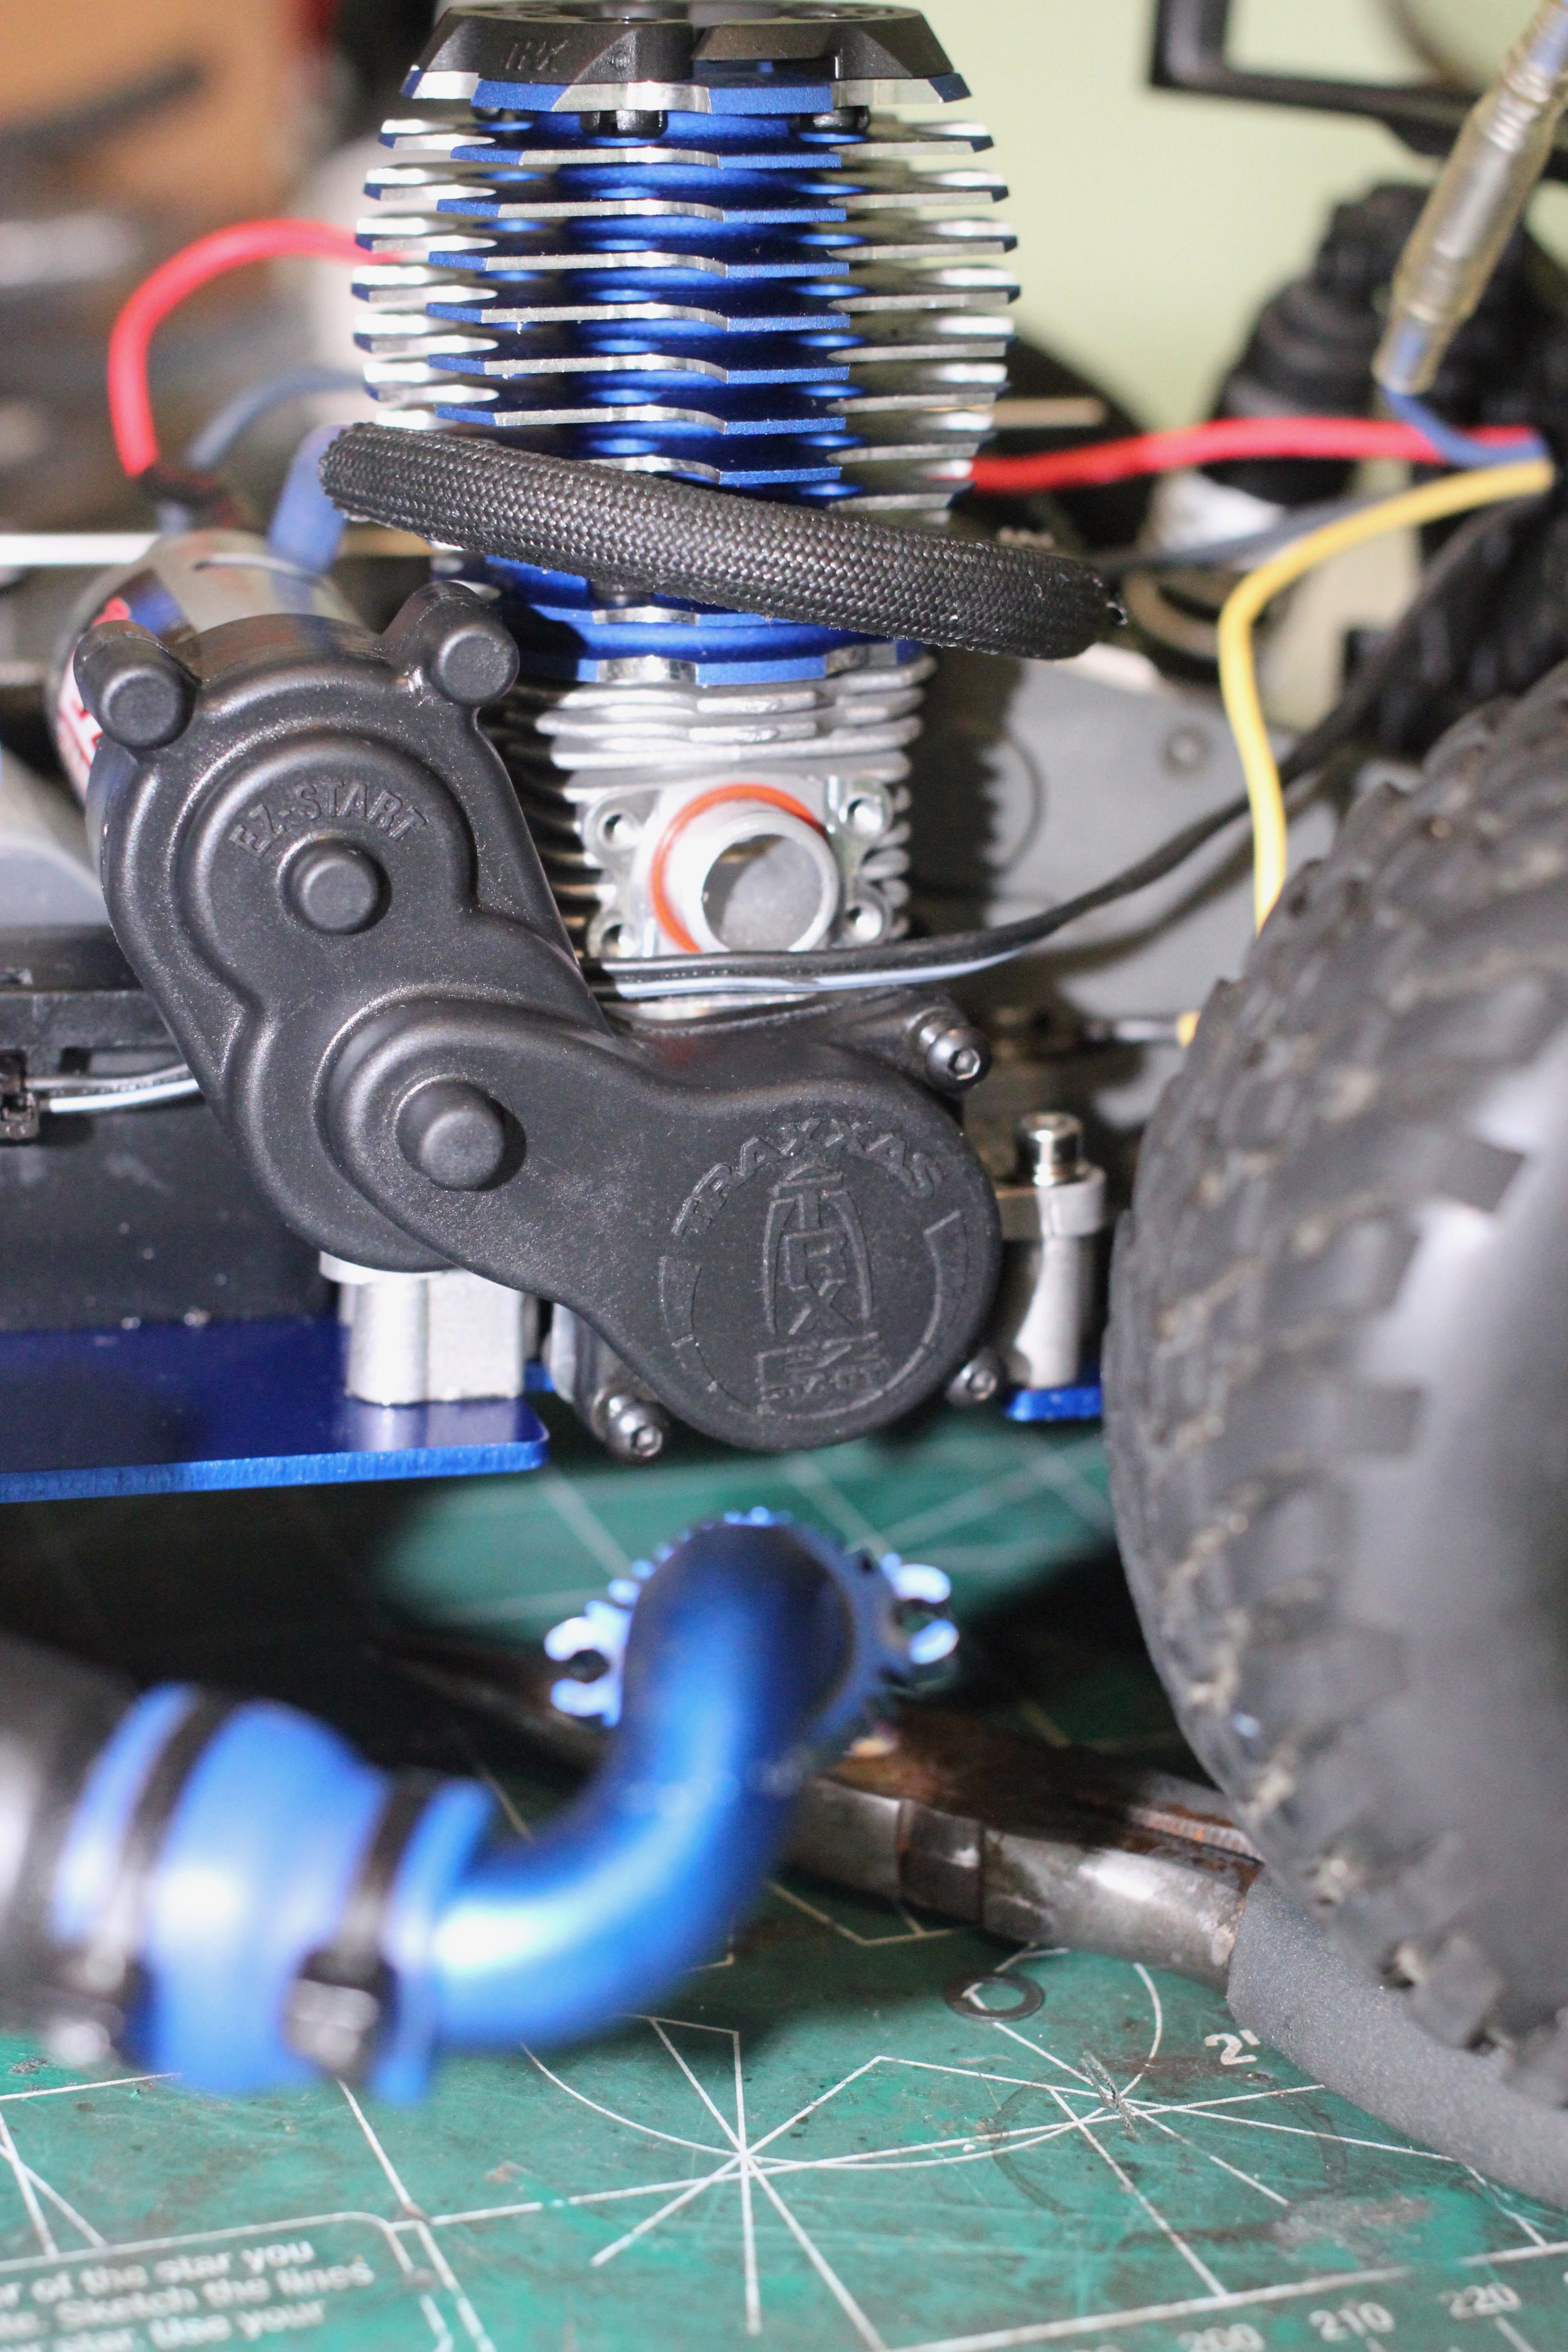
If you have a new motor you will remove the pull start if you want to attach the EZ start. There are just three screws and it is very easy to attach. Just learn from me and move the black wires BEFORE mounting the EZ start. If you forget just cut the zip ties and you can move the wire over the head/the motor.
Now connect your fuel lines, set your gear mesh (plan to cover next week), attach your exhaust pipe, add some fuel, and you are ready to start breaking in the new motor! The exhaust should line up to the holes that fit on the block. I don’t do those bolts to German spec, but I make sure they are very snug. Next week we should see it running! Same bat time and same bat place!
I hope this helps you get your Traxxas nitro back outside! Thank you for reading. Until we meet again may the Lord’s blessing and peace be upon you.
#traxxasslash #nitro #amainhobby #horizonhobby